Monday, April 21, 2014

S-Tuner Idea

S-Tuner is an idea I cooked up when I first got my MSP-430 development board from Texas Instruments. What a great little board for developing microcontroller projects!

After playing around with the MSP-430 for a while, it struck me what to do with it. I had seen a few stroboscopic guitar tuners the web. None of them had the features I wanted, so I decided to create my own.

My tuner had the following requirements:
  1. Be able to tune each string.
  2. Be able to tune in different tunings.
  3. Be accurate.
  4. Be stable.
  5. Dual Diode Strobe
  6. Adjustable Strobe Pulse Width
I first started out with the schematic. The schematic is covered in the next entry.

Friday, April 12, 2013

NetBeans Java Code Templates

 I really like developing Java with NetBeans. I have been using NetBeans since it was Forte4J.

One of the many features I like about NetBeans is the Code Templates.  All you have to do to use Code Templates is enter an abbreviation of the Code Template and hit the TAB key. Netbeans automatically converts the abbreviation into proper Java code.

A few examples:

sh<TAB>
results in:
short | 
(The pipe character is where the cursor will be located.)

dowhile<TAB>
results in:
do {
} while (boolean);
(The highlighted boolean indicates the word is going to be replaced with whatever you type next. So if you have a variable ready to use for your do-while loop, all you have to do is type the name of your variable.)

  dowhile<TAB>myCondition
 results in:
 do {
 } while (myCondition|);

If you are a user of NetBeans and do not use the Code Templates, I would highly recommend getting familiar with some of the abbreviations and give them a try. I know it saves me a lot of typing.

Some of my favorites are:
Psf      (public static final)
Psfs     (public static final String)
fore     (new for block)
if       (if statement)
ife      (if-else statement)
pm       (private method)
psf      (private static final)
psm      (private static method)
spl      (for String.split)
trycatch (try-catch block)


Code Template Example Table

Notes:
  1. The names in the Abbreviation column are my names.
  2. Highlighted words indicate NetBeans has selected the word and will replace the word with whatever is typed next.
  3. The pipe character (|) indicates the position of the cursor after expansion.
  4. Some of the longer code examples, such as jaxbu, have been truncated to fit the table.


Abbreviation (my name)
Code Example and Notes
2al (arrays as list) List<String> list = new ArrayList<String>(
Arrays.asList(arr));

Note: replaces both String with the name you type
2ar (to array) clazz[] arr = coll.toArray(new clazz[coll.size()]);
2l (arrays as list) List<String> list = Arrays.asList(arr);
2s (double set) Set<String> set = new HashSet<String>(Arrays.asList(arr));

Note: replace both String with the word you type
En (enumeration) Enumeration|
Ex (exception) Exception|
Ob (object) Object|
Pf (public final) public final |
Pfm (public final method) public final void method() {
}
Pm (public method) public void method() {
}
Ps (public static) public static |
Psf (public static final) public static final |
Psfb (public static final boolean) public static final boolean |
Psfi (public static final int) public static final int |
Psfm (public static final method) public static final void method() {
}
Psfs (private static final string) private static final String |
St (string) String|
ab (abstract) abstract |
al (array list) List <String> l = new ArrayList <String>();

Note: replaces both String with the name you type
ap (append) sb.append();
apo (append expression) if (sb.length() > 0) {
sb.append (',');
}
sb.append ("exp=");
sb.append (exp);
as (assert) assert boolean;
asort (array sort) Arrays.sort(Array);
bcom (block comment) /*|*/
bo (boolean) boolean |
br (break) break;|
ca (catch) catch (Exception ex) {
}
cl (class) class |
cn (continue) continue|
cs (case) case what:
break;
csort (sort) Collections.sort(var);
db (double) double |
df (default) default:|
do (do while block) do {

} while (boolean);
dowhile (do while block) do {
} while (boolean);
eq (equals) equals|
ex (extends) extends |
f (final) final |
fa (false) false|
fc (final class) final class Type {
Type() {
}
}
Note: replaces both Type with the name you type
fcom (edit fold for comment) //<editor-fold defaultstate="collapsed" desc="comment">
//</editor-fold>
fi (final) final |
fl (float) float |
for (old for block) for (int i = 0; i < 10; i++) {
}
forc (for iterator) for (Iterator it = col.iterator(); it.hasNext();) {
Object object = it.next();
}
fore (new for each) for (Object object : col) {
}
forl (for block) for (int i = 0; i < lst.size(); i++) {
Object object = lst.get(i);
}
form (for map block) for (Map.Entry<Object, Object> entry : m.entrySet()) {
Object object = entry.getKey();
Object object1 = entry.getValue();
}

Note: replaces all entry with the name you type
forst (for string tokenizer block) for (StringTokenizer stringTokenizer
     new StringTokenizer(STRING); 
     stringTokenizer.hasMoreTokens();) {
     String token = stringTokenizer.nextToken();
}

Note: replaces all stringTokenizer names 
      with the name you type
forv (for block) for (int i = 0; i < vct.size(); i++) {
Object object = vct.elementAt(i);
}
fy (finally block) finally {
|
}
iae (illegal argument exception) throw new IllegalArgumentException("arg");
ic (class) class Type {
Type() {
}
}

Note: replace both Type with the name you type
ie (interface) interface |
if (if block) if (boolean) {
}
ife (if else block) if (boolean) {
} else {
}
ifelse (if else block) if (boolean) {
} else {
}
iff (if statement) if (boolean) {
}
im (implements) implements |
in (interface) interface |
inst (instanceof test) if (instanceName instanceof Object) {
Object object = (Object) sb;
}
iof (instanceof) instanceof |
if (if statement) if (boolean) {
}
ise (illegal state exception) throw new IllegalStateException("arg");
jaxbm (jaxb marhaller) try {
    javax.xml.bind.JAXBContext jaxbCtx = 
        javax.xml.bind.JAXBContext.newInstance(
            sb.getClass().getPackage().getName());
    javax.xml.bind.Marshaller marshaller = 
        jaxbCtx.createMarshaller();
    marshaller.setProperty(javax.xml.bind.Marshaller.JAXB_ENCODING, 
        "UTF-8"); //NOI18N
    marshaller.setProperty(
        javax.xml.bind.Marshaller.JAXB_FORMATTED_OUTPUT, 
        Boolean.TRUE);
    marshaller.marshal(sb, System.out);
} catch (javax.xml.bind.JAXBException ex) {
    java.util.logging.Logger.getLogger("global")
        .log(java.util.logging.Level.SEVERE, null, ex);
}

Note: replaces both sb with the name you type
jaxbu (jaxb unmarshaller) try {
    javax.xml.bind.JAXBContext jaxbCtx = 
        javax.xml.bind.JAXBContext.newInstance(
            sb.getClass().getPackage().getName());
    javax.xml.bind.Unmarshaller unmarshaller = 
        jaxbCtx.createUnmarshaller();
    sb = (StringBuilder) unmarshaller.unmarshal(
        new java.io.File("File path")); //NOI18N
} catch (javax.xml.bind.JAXBException ex) {
    java.util.logging.Logger.getLogger(
        "global").log(java.util.logging.Level.SEVERE, null, ex);
}

Note: replaces both sb with the name you type
le (length) length|
ll (linked list) List<String> list = new LinkedList<String>();

Note: replaces both String with the name you type
logb (log bundle key) logger.log(Level.INFO, "bundle_key");
logbps (log bundle key with format) logger.log(Level.INFO, "bundle_key", new Object[]{null});
logr (logger) private static final Logger logger = Logger.getLogger(CurrentClass.class.getName());|
logrb (logger) private static final Logger logger = Logger.getLogger(CurrentClass.class.getName(), CurrentClass.class.getPackage().getName() + ".Log");
m (new method) private static final void method() {
}
map (map) Map<String, String> map = new HashMap<String, String>();
n (new object) Object object = new Object();

Note: replace all three object with the name you type while keeping the camel case on object; i.e.:
newo MyObject
MyObject myObject = new MyObject();
na (native) native |
newo (new object) Object object = new Object();

Note: replace all three object with the name you type while keeping the camel case on object; i.e.:
newo MyObject
MyObject myObject = new MyObject();
npe (null pointer exception) throw new NullPointerException("sb");
pe (protected) protected |
pf (private final) private final |
pfc (private final class) private final class Type {
Type() {
}
}

Note: replaces both Type with the name you type
pfm (private final method) private final void method() {
}
pm (private method) private void method() {
}
pr (private) private |
prfm (protected final method) protected final void method() {
}
prm (protected method) protected void method() {
}
prsfm (protected static final method) protected static final void method() {
}
ps (private static) private static |
psf (private static final) private static final |
psfb (private static final boolean) private static final boolean |
psfc (private static final class) private static final class Type {
Type() {
}
}

Note: replaces both Type with the word you type
psfi (private static final int) private static final int |
psfs (private static final string) private static final String |
psm (private static method) private static void method() {
}
pst (print stack trace) printStackTrace();|
psvm (main method) public static void main(String[] args) {
|
}
pu (public) public |
pue (public enum) public enum Type {
}
pvb (private volatile boolean) private volatile boolean |
re (return) return |
rn (return null) return null;|
runn (runnable) Runnable runnable = new Runnable() {
public void run() {
}
};
sb (string builder) StringBuilder stringBuilder = new StringBuilder();
sc (static class) static class Type {
Type() {
}
}

Note: Replaces both Type with the name you type
serr (system error) System.err.println("|");
set (new hashset) Set<String> set = new HashSet<String>();

Note: Replaces both String with the word you type
sfc (static final class) static final class Type {
Type() {
}

Note: Replaces both Type with the name you type
sh (short) short |
sout (system out) System.out.println("|");
soutv (system out with text) System.out.println("sb = " + sb);
spl (for string.split) for (String string : string.split(",")) {
}
st (static) static |
su (super) super|
sw (switch statement) switch (var) {
case val:
break;
default:
throw new AssertionError();
}
sy (synchronized) synchronized |
tds (thread dump stack) Thread.dumpStack();|
th (throws) throws |
tr (transient) transient |
trycatch (try-catch block) try {
|
} catch (Exception e) {
}
tw (throw with excpetion) throw new IllegalStateException();
vo (volatile) volatile |
wh (while) while (boolean) {
}

Notes: attempts to find boolean
whileit (while with iterator) while (it.hasNext()) {
Object object = it.next();
}

Notes: attempts to find an iterator
whilen (while with enumerator) while (en.hasMoreElements()) {
Object object = en.nextElement();
}

Notes: attempts to find an enumerator
whilexp (while with expression) while (boolean) {
}

Notes: attempts to find a boolean value

Monday, December 17, 2012

Adding functionality to the Stellaris LaunchPad project0

This is a simple tutorial about how to expand the Stellaris LaunchPad project0 to expand the functionality a little. Perhaps this will guide somebody into advancing their knowledge.

Project0 is also known as the qs-rgb project. It is the project that ships installed on the Stellaris LaunchPad. This assumes you have installed and can use Code Composer Studio and StellarisWare Complete. If you have not imported the qs-rgb project, you can find it in the [StellarisWare root directory]/boards/ek-lm4f120xl/gs-rgb directory.

I am going to add functionality that will allow you to pause the LED on the current color or resume the cycling of the colors.

Let's start by opening  qs-rgb.h and defining a variable to hold the state of our pausing the application. We will add our variable to the sAppState_t struct. Modify the code starting at line 50 to the following:

//*****************************************************************************
//
// Structure typedef to make storing application state data to and from the
// hibernate battery backed memory simpler.
//      ulColors:       [R, G, B] range is 0 to 0xFFFF per color.
//      ulMode:         The current application mode, system state variable.
//      ulButtons:      bit map representation of buttons being pressed
//      ulManualIndex:  Control variable for manual color increment/decrement
//      fColorWheelPos: Control variable to govern color mixing
//      fIntensity:     Control variable to govern overall brightness of LED

//      usPauseState    Control variable to govern pausing of LED
//
//*****************************************************************************
typedef struct
{
    unsigned long ulColors[3];
    unsigned long ulMode;
    unsigned long ulButtons;
    unsigned long ulManualIndex;
    unsigned long ulModeTimer;
    float fColorWheelPos;
    float fIntensity;
    unsigned short usPauseState;

}sAppState_t;


Now, we will add a function declaration to the end of the file. Modify the code starting at line 92 to add the following:
extern void AppPause(void);


 We now move to qs-rgb.c.

The first thing to do is keep the documentation up to date. Add the following line at line number 70:
//! Command 'pause' will toggle the cycling of the LED.
  
We could set the usPauseState anywhere we want, but to keep the code cleaner, we will modify the value only within a function. That way, anything within the application could change the pause state by calling the method. Add the following function at the end of the functions before the main function. This could be added anywhere within gs-rgb.c file, but I put mine in at line 458.
//*****************************************************************************
//
// Uses the usPauseState variable to indicate the paused state of the LED
//
// This function is called when system has decided it is time to pause or
// resume the cycling of the LED
//
//*****************************************************************************
void
AppPause(void)
{
    if (g_sAppState == 0) {
        g_sAppState.usPauseState = 1;
    } else {
        g_sAppState.usPauseState = 0;
    }
}


We are not actually going to pause the application. We are just going to prevent the updating of the LED color values. We are going to do this within the SysTickIntHandler. This function is the main action handler for the LED. Whenever the system handler interupts, this function is called. We will just prevent the update of the LED depending on our bPauseState.
 void SysTickIntHandler(void) {

    static float x;

    g_sAppState.ulButtons = ButtonsPoll(0, 0);
    AppButtonHandler();

    if (g_sAppState.usPauseState != 0) {
        //
        // Auto increment the color wheel if in the AUTO mode. AUTO mode is when
        // device is active but user interaction has timed out.
        //
        if (g_sAppState.ulMode == APP_MODE_AUTO) {
            g_sAppState.fColorWheelPos += APP_AUTO_COLOR_STEP;
        }

        //
        // Provide wrap around of the control variable from 0 to 1.5 times PI
        //
        if (g_sAppState.fColorWheelPos > (APP_PI * 1.5f)) {
            g_sAppState.fColorWheelPos = 0.0f;
        }
        if (x < 0.0f) {
            g_sAppState.fColorWheelPos = APP_PI * 1.5f;
        }

        //
        //    Set the RGB Color based on current control variable value.
        //
        AppRainbow(0);
    }
}

The application is now ready to pause and resume the LED cycling. We now need to add the ability to communicate our desire to pause or resume the LED cycling.

We first need to add the function declaration of our communication function to the rgb_commands.h file. Add the following line to the end of the declared functions at line 58:
extern int CMD_resume (int argc, char **argv);

Next, we need to add the callback to actually allow our command to be part of the system. Open rgb_commands.c and add the following at line 45:
    {"pause",    CMD_pause,     " : Pause or resume the cycling of the LED"},

Now we needd to actually implement the function that our command will call. Enter the following at the end of rgb_commands.c:
//*****************************************************************************
//
// Command: pause
//
// Pause the cycling or resume the cycling of the LED
//
//*****************************************************************************
int
CMD_pause (int argc, char **argv)
{
    (void) argc;
    (void) argv;
    AppPause();

    return (0);
}


Our last thing to do is to set an initial value for our control variable. In the first lines of our main() method, we will ensure the variable is set to initially cycle the LED (anything that is not zero). Modify the main method as shown below:
int main(void) {
    unsigned long ulStatus;
    unsigned long ulResetCause;
    long lCommandStatus;

    // make sure the app is set to cycle the LED
    g_sAppState.usPauseState = 1;


Now if you run the application and connect with your terminal program, when you type 'help' you should see the following:

Notice that our new 'pause' command is now listed on our terminal.

If you type pause into your terminal the Stellaris LaunchPad will either pause the cycling of the LED or resume the cycling of the LED.

Notice that you can still set the intensity and rgb color of the LED even while it is paused.

This has been a very simple tutorial to hopefully help somebody start down the road of discovery.

Wednesday, November 21, 2012

Setting up PuTTY or Tera Term for a Serial Connection to Stellaris Launchpad

My Stellaris Launchpad finally arrived today! What an awesome device! I am going to have a lot of fun with this. After verifying and playing with the qs-rgb demo, I decided it was time to try and connect to it serially. That is where trouble began, and I had to research. Hopefully, this blog will help somebody save a little time.

Windows Setup:

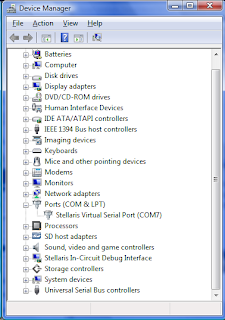
Device Manager window
Ensure your Stellaris Virtual Serial Port is available.
  1. In your Windows Start Search type in Device Manager and open it.
  2. In the Device Manager, expand the Ports (COM & LPT) group.
  3. You should see something like what is on the right.
  4. Make note of the port the device is using. In this case COM7.
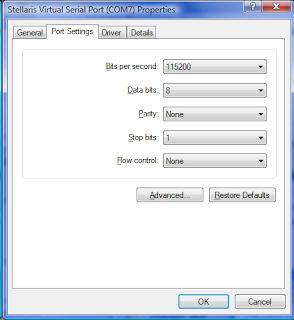
Port Setting properties for Stellaris Virtual Serial Port


While you are here check the port settings.
  1. Double click on the Stellaris Virtual Serial Port to bring up the device properties.
  2. Click on the Port Settings Tab.
  3. Ensure the following settings:
  • Bits per second: 115200
  • Data bits: 8
  • Parity: None
  • Stop bits: 1
  • Flow Control: None


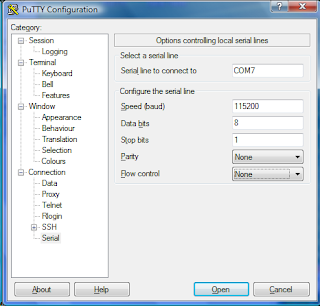
PuTTY Serial properties
Setting up PuTTY:
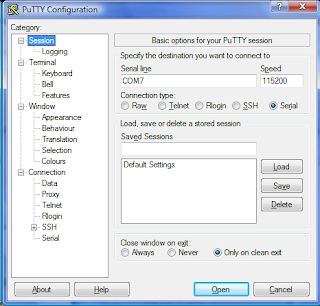
PuTTY Session properties
  1. Open PuTTY and goto the Cattegory: Connection -> Serial
  2. Verify the following settings:
    • Serial line to connect to: COM7 (this is the port discovered from the Device Manager)
    • Speed (baud): 115200
    • Data bits: 8
    • Stop bits: 1
    • Parity: None
    • Flow control: None
  3. Goto Category: Session
  4. Click the Connection type: Serial
  5. Ensure Serial line is COM7 (the port discovered from the Device Manager)
  6. Speed: 115200
  7. Hint: you can save your settings as the Default Settings or some other Saved Sessions name to save you setup time in the future at this point by using the Saved Sessions input and the Save button.
  8. Click the Open button at the bottom of the dialog
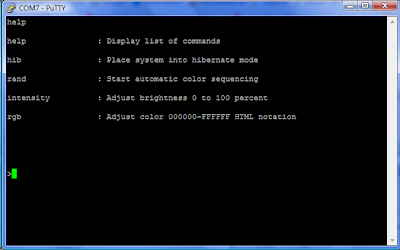
  9. A terminal window will open
  10. Type help and press the Enter key
  11. You should see somehting like the image below
  12. Congratulations! You are talking with your Stellaris Launchpad!


PuTTY terminal window

Setting up Tera Term
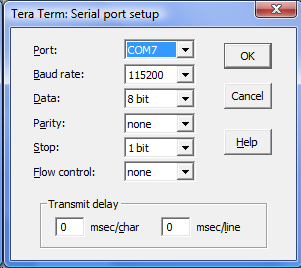
Tera Term Serial port setup
  1.  Open Tera Term and navigate to the menu Setup -> Serial Port...
  2. Ensure the following settings:
    • Port: COM7 (the port discovered from the Device Manager)
    • Baud Rate: 115200
    • Data: 8 bit
    • Parity: none
    • Stop: 1 bit
    • Flow control: none
  3. Select the menu File -> New Connection
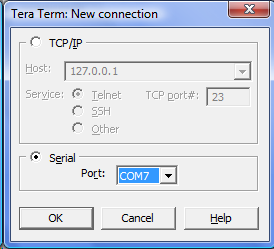
  4. On the Tera Term: New connection dialog, verify the following:
    • Serial is selected
    • Tera Term new connection
    • Port: COM7 (the port discovered from the Device Manager)
  5. Click OK
  6. If you get a Cannot open COM7 error, reset the Launchpad by pressing the reset button on the board.
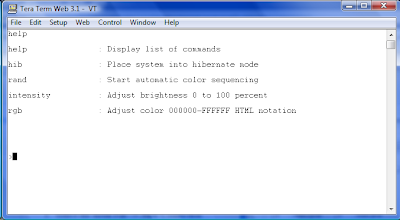
  7. Type help and press the Enter key. You should see a terminal window like the one shown below.
  8. Tera Term terminal window
  9. Congratulations! You are talking with your Stellaris Launchpad!